
Which webflow framework should I use for my project?
9.22.2023
7.5.2024
Caleb Raney
Note: This post was updated on Feb 20, 2024 to reflect the latest versions of each of these frameworks when it comes to implementing Webflow variables. Variables were released in Oct 2023 and are a massive improvement to creating scalable design systems in Webflow but each framework utilizes them differently so I tried to explain how their usage of variables impacts the effectiveness of the framework overall.
Webflow frameworks are a relatively new concept considering that Webflow was founded in 2012. While I’m not sure entirely sure when the first framework was created, they have significantly grown in popularity over the past couple years. As of right now there are several different options when it comes to choosing a framework and each of them has a very different approach which can make it confusing when making a decision on which one to go with for a new Webflow build. Below i go into specifics about the methodology, benefits, and possible downsides of the Client-First, MAST, and Lumos frameworks.
A quick disclaimer
Before getting into the breakdowns I wanted to give a disclaimer, the opinions below are based on my opinion and experience working with these frameworks. I have over 4 years of experience working with Webflow and have quite a few client projects under my belt at this point but everyone has their own development style and so at the end of the day you should pick whatever works best for you and your clients, my only goal here is to help you make a more educated decision. Before diving in, let’s start with the basics.
What is a Webflow framework?
A Webflow framework is a system that gives detailed instructions on how to structure a Webflow site. A good framework will include documentation that includes class naming, page and section structure, usually some type of utility system, and a cloneable style guide to use when starting off new projects.
The benefits of a framework
It’s important to note that while I will be comparing several frameworks below and talking about their pros and cons, using any framework has some major advantages vs just winging it.
Learn and use best practices for Webflow development
First off, each of these Webflow frameworks will help educate you about (and enforce) best practices. Learning one (or all) of them will help you become a better Webflow developer and so even if you decide at the end of the day that a specific framework isn’t for you it won’t be time wasted.
Work smarter, not harder
The second main benefit of using a framework is that it helps you work faster. Being able to have classes that are already styled that you can add to an element (whether it be a button, heading, or even a layout) is a huge boost to productivity.
Make sites that other people can edit.
Finally, using a framework is incredibly helpful when it comes to collaboration within Webflow. Whether that is working with other people on your team or handing it off to a client, having clear documentation explaining how a site was built is incredibly important when it comes to keeping a site organized. As soon as a site starts getting classes like Div Block 12 and Image 28 it becomes much harder to manage global updates and quickly add new content to a site.
Why focus on these specific frameworks?
I’m not going to discuss every framework out there in this article. Each of the three frameworks I’ve listed in this article are the only ones that matched the following criteria:
- Include thorough documentation on typography, color, page and section structure, a utility system, and class naming conventions.
- Are actively updated by the teams who created them when new Webflow features come out.
- Have gotten a lot of love from the Webflow community, are well crafted and created by people who have a lot of technical knowledge about Webflow and web development.
- Is a framework that I have read all the documentation for, tried out on a project, and found enjoyable to use.
At the bottom of the article I’ve included a few honorable mentions of other frameworks, that while I haven’t personally meshed with as much, are still well thought out and deserve recognition in case you want to check those out too.
Now that we’ve covered the basics lets jump into the frameworks themselves.

Client-First
Client-First was the first framework that really blew up in the Webflow community (it launched August 2021) and is by far the most used one out there. If you’ve heard of any Webflow framework its most likely this one, and that comes with some advantages, but some Webflow developers aren’t aware that there are other options out there and knowing what the options are is the first step in making an informed decision.
Client-First was developed by the team at Finsweet, an enterprise Webflow partner that has done huge amounts of good for the community, and they were one of the first agencies to really champion the benefits of using frameworks and take them up a notch in terms of quality. Earlier Webflow frameworks were mostly just cloneables that included typography that was already responsive, some buttons, and maybe some global structure classes. Client-First stood apart because they created super in depth explanations that didn’t just cover the how, but the why. Reading through the docs helps you understand the roles of different types of classes, various strategies you can use when building a site, and what the pros and cons are when it comes to things like stacking classes.
The approach
One of the key aspects of the Client-First system is that anyone should be able to use it, from people who have just finished learning the basics of Webflow to developers with years of experience. If you look at any element in a Client-First build you should be able to tell what the element is for and where it is used just by reading the class name.
This has a couple of large implications, firstly no abbreviations. While a lot of development systems use abbreviations to make things quicker to type Client-First avoids them in favor of full words, so it is common to get class names like home-header_background-image. While this does make it much easier for anyone to read this definitely has its downsides, (which I’ll go into soon).
Another key aspect of Client-First is that it has a pretty minimal utility system. Typography, color, spacing, and core structure classes are included but any layouts or anything that requires any other CSS properties is given a custom class. Once again, this plays into the ease of use and lower learning curve. The odds of a Webflow novice coming into a build and making unintended changes are much lower when the class they are modifying has a very specific and narrow purpose. Client-first tends to have a lot more custom classes than builds using Mast or Lumos because of this.
Key benefits
1. Beginner friendly(ish)
In terms of benefits one of the main ones is that it is an easier system to learn than the other two. This is offset a little by Client-First having the most thorough (and intimidating) documentation of the three. However, overall it is a system that is more forgiving towards people who aren’t professional Webflow developers.
2. Widely known and used
Being incredibly popular means that using Client-First has good name recognition. Some clients will ask specifically for developers who know Client-First because they know that a build will be more organized and predictable than if it built by someone who doesn’t use a framework or hasn’t learned one.
3. Incredible amount of resources.
You can’t get away with talking about Client-First without also mentioning Relume Library. In case you haven’t heard of it, Relume library is a Webflow component library that is built using the Client-First system allowing you to quickly copy and paste from a huge library of pre-built minimally styled components into your Webflow project. This drastically speeds up the amount of time it takes to build a Client-First site. Along with Relume library the Finsweet Chrome extension also pairs really well with the system, allowing you to bulk rename classes based on their folder names. Additionally, the Finsweet team published over 10 free cloneable sites built with the system that you can use to learn (or even as a starting point for your site). Of all the Webflow systems Client-First definitely has the most amount of resources which is definitely a huge benefit to using this system.
Other Considerations
In spite of all of those benefits Client-First does have some downsides and it is important to be aware of them before going all in.
1. Projects get bloated.
Because Client-First relies on custom classes more than utilities (compared to most other systems) this results in builds getting a lot more classes and a larger CSS stylesheet. Additionally, Client-First uses a lot more layers of html (rather than just a section and container, there are also separate divs for horizontal page padding, and vertical section padding). This difference is pretty minor when it comes to smaller sites, but the larger a site gets, the more bloated things become. This bulk can make it harder to sort through all of the custom classes, name things clearly, and also have negative impacts on site performance. Note: the performance impact is going to be much smaller than how you approach image optimization and javascript usage, but it is still a factor in the decision.
2. Harder to make global changes
While some global changes (like adjusting page padding, or font size) can be easily made, what if you want to update the spacing underneath every h2, or change all your images to have a larger border radius? With Client-First there is no easy way to manage these kinds of updates and so it can result in a lot more time spent when it comes to website maintenance (especially on larger sites). Client-First is also the framework on this list that has utilized Webflow variables the least. In Client-First Webflow variables are currently only used for Color, and they have chosen to wait on adding other variables until Webflow releases native breakpoint adjustments. In my opinion this is undervaluing a major feature and decreases the scalability of Client-First projects compared to the other frameworks on this list. This means there is no system to manage recurring size or typography values across various classes built in. That being said, the color system is pretty robust and does include both option variables and semantic variables for more precise control over colors throughout the project.
3. Slower to build with
Because of the smaller utility system, additional layers of divs, and longer class names, building in Client-First is more time consuming than in other systems. This extra time can be eliminated by using Relume library but that does require a paid subscription so it is still worth noting that the native system is not a quick to build with as the alternatives.
Final Thoughts
All in all Client-First is an incredibly well thought out and documented framework that has a lot of community resources attached to it. It is definitely worthwhile to learn and can be great for a lot of different websites. That being said it does have downsides when it comes to site updates and speed, especially when used on larger websites. I’d definitely recommend looking into this system even if you don’t want to use it because you’ll probably learn some helpful things about how Webflow works and there’s a decent chance you’ll encounter Client-First builds in your Webflow career. Now on to the next framework.

MAST
This framework was released in March 2023 by NoCodeSupplyCo, but it utilizes a lot of ideas from traditional Web Development that pre-date Webflow. The system comes with a really well thought out naming convention that balances clarity with brevity in an elegant way. Throughout the past few months its gotten a lot of praise and has a growing community of devs that swear by it.
The approach
Mast addresses a lot of the same concepts and structures as Client-First but with a different approach. At the core Mast is built to help you to create sites more quickly by providing a set of strategies and utilities that speed up the process of Webflow development while keeping the system as light and clean as possible. One example of this is that headings come with bottom margins applied to try and help you have to apply spacing less often, occasionally you’ll need to override the margin with a unique class but if most of the time it works out of the box that’s one less thing you need to worry about when building a section.
Along with this, Mast is trying to minimize the amount of classes you need to create, which it accomplishes in several ways. Firstly Mast includes a layout system built on a 12 column grid, (a layout system that’s been used almost as long as the internet has existed). This system reduces the need for a lot of custom classes but can have its own tricks and difficulties when it comes to modifying it. Another example of this minimalist approach is that the typography system only includes 4 heading styles by default (with the option to add an h5 and h6 if needed).
It's also worth mentioning that Mast has a pretty robust system in place for creating variables. These are done in a very Webflow-native way that doesn't require modifying custom code, if variables are needed for different breakpoints a new one is created for each breakpoint and then the values need to get updated on the class to be overridden on each breakpoint. While this is a logical way of tracking things it can be a bit more time consuming to implement because it involves plenty of overwriting values across breakpoints, on the other hand, the values for smaller breakpoints are much more easily visible rather than being in a code embed. Another small issue I have with MAST's approach to variables is that it doesn't include any semantic color variables, this means there is no easy way to just modify the primary text color, or border color, without updating the global swatch as a whole.
Key Benefits
1. Work faster with less classes
Mast allows you to build sites quicker than Client-First does. Little things like the heading margins using ems so they automatically scale with the text size are a major time saver. Also, having a layout system included allows you to build new layouts without needing to add new classes is definitely a nice touch. It can take a little getting used to with regards to which stacked classes you need to add in order to align things how you want them but its incredibly flexible and still leaves room for custom classes when they are necessary.
2. Keep it light
The methodology, naming convention, and overall structure makes it extremely easy to browse through a Mast project. This also comes with performance benefits as well, the base CSS in the Mast cloneable is only 32 KB which is very impressive for how much it still covers.
3. Concise class names
Of all the systems in this list, class names in MAST are going to be the most concise. The system of prefixes and infixes is really clear and the overall convention is close to BEM which will speed up the learning curve for anyone with traditional front-end development experience. Mast also has a very clear naming convention for Variables that prioritizes legibility and groups variables by components.
Other considerations
1. Difficulty with layout system updates
Personally, I find the layout system a little frustrating to use. The longer you stick with it the faster you get so I’m sure for someone who uses MAST on every build they’re very quick at making updates but it does feel like a bit of an uphill battle due to the amount of stacked classes needed on each column and row div. For me this primarily comes into play when making modifications on an existing layout (especially on mobile breakpoints). Remembering which stacked classes you were using and removing them and re-adding them can be a frustrating workflow, and while it does save on additional CSS its worth considering if it will speed things up for you or slow you down.
2. Can’t update layouts globally.
The flip side of not having to create new classes for individual layouts is that it becomes much harder to make global changes to layouts. If you have a gallery section that needs an additional column there is no way to update this if the layout is used throughout the site without having to manually update each instance of the layout. This can be mitigated by using Webflow components but depending on the type of section that might not always be the best solution either.
3. Relies on a 12-column grid.
While this is in a sense both a positive thing and a restraint it is important to note that because the MAST layout system uses a 12 column grid, it is important that the design you are building matches that. While this can be a helpful design constraint for yourself, if you’re working with a designer who doesn’t use this it may make the design to development transition a bit more difficult.
Final Thoughts
Overall, MAST really plays to the benefits of Webflow, it helps you to create layouts quickly, manage key design features globally, and overall create a site that is organized, performant and intuitive. I think the main dealbreaker for most people (at least it was for me), is how well you work with the 12 column layout system. If you find designing, building, and updating layouts with that system to work well, then the rest of MAST will probably click really easily. Now on to Lumos.

Lumos
Lumos by Timothy Ricks (released on July 30th, 2023) is the newest of the frameworks on this list. It takes a radically different approach compared to Client-First and MAST. While it is definitely more challenging to learn, the added complexity comes with a lot of really unique benefits that no other Webflow framework has offered up until this point. I’ve built a couple client sites using it and I think it is going to be the one that I use whenever I can justify it moving forward (more on that later). Its worth noting that Lumos has gone through a pretty massive amount of changes since its initial release. The release of Webflow variables were a major benefit for Lumos but also required a major overhaul. Now that v2 has officially been released the system is a lot more user-friendly and a lot of the difficulty has been toned down but you'll still need a better understanding of CSS to use this framework vs the other two.
The approach
What sets Lumos apart from every other framework is its unique utility system. Most Webflow frameworks include utility classes for setting consistent styles like headings, font weights, spacing etc., but to use these utilities you need to add each of them as stacked classes. This can often result in an element needing 4+ classes in order to style it correctly. In traditional web development this wouldn’t be an issue but in Webflow you can’t copy and paste all classes on an element, or re-arrange classes, or easily delete or rename one in the middle of a list. Because of this, most other frameworks recommend just creating custom classes once you hit 3 or 4 stacked classes. This approach gets around the combo class frustration but detracts from the value of the utility system and makes things harder to update down the road.
Lumos deals with this problem in a really creative way. First off, lumos has the most robust usage of variables out of any of the other frameworks out there allowing you to reference global values like the horizontal page padding in component classes. This makes the entire site much more maintanable just from the variables panel. Secondly, in lumos every element starts with a component class and has utilities stacked on top of that component class. This gives you even more control over elements throughout your site because you can rename a class within a specific stack eg. your card_title u-text-h1 to instead be a card_title u-text-h2 and that will update every instance of your blog title to have the h2 heading style instead of the h1 heading style, whereas normally, you'd have to find each instance of that card and manually update the utility classes used. Lumos takes this setup and applies it to Layout, Spacing, Typography, Color, and other various utilities. To better understand how this works check out this quick video by Timothy Ricks
Key Benefits
1. Global Edits on a completely new level
The Lumos utility system allows you to have much more control over global edits by being able to update values in variables or the code embed to easily make site-wide changes. For example if you have all your gallery images and cards throughout the site share the same border-radius and you want to update it from 24px to 48px you can do that in under a minute by updating the value in the custom code embed rather than having to track down each element that uses that border radius and manually update it. At the same time if you just want to update one of those elements you can also just update the class to reference a different border radius utility or remove it altogether.
2. Unlock the power of color modes
Lumos has a really unique approach to color that is based on design system best practices. To summarize, when you set up the styleguide you’ll define the font, background, and border colors for each mode and that is going to dynamically update the colors of elements inside of that element. While it is definitely one of the more complex parts of Lumos it is also one of the most powerful. Using the color system you can completely recolor a section or page by changing the name of a class or attribute, making it incredibly easy to set up light and dark mode transitions, change the page color based on scroll, and more. On a recent client project I was able to make the navbar match each of the four unique color modes when they were scrolled into view. For more details on how this works check out this tutorial.
3. A customizable layout system
Another one of the great benefits is that you can quickly create layouts and update spacing in a way that is both flexible and connected to the component class. While both of the other frameworks include spacing systems that are responsive, neither of them are tied to the class name. In Lumos however, you can easily add a unique bottom padding for your gallery_h2 using the adaptive spacing variables and its going to update everywhere that class is used while also decrease sizing on mobile (in Client-First and MAST adding spacing is done using a stacked class, or a wrapper div which means tracking down each instance of that space and updating them individually). The same goes when creating grid and flex layouts in Lumos.
4. Webflow components that you can make design changes to
Lumos integrates really seamlessly with components, each of the color modes and the core section spacing utilities also have an attribute selector. This means that you can create components with the option to modify the vertical and horizontal spacing, button styles, color modes and more without having to unlink the component. This level of versatility just isn’t an option in the other two frameworks without having to write a lot of custom CSS for each specific component.
Other Considerations
1. High complexity
I’d say by far the biggest downside of Lumos is that it is much more complex to learn than the other two frameworks, this can definitely be overcome by putting in some effort to watch through Timothy Rick’s tutorials but it becomes more of an issue when it comes to collaboration and client hand-off. It takes some adjustment to know if you should edit styles by changing the name of a class to reference a different utility, change a utility value in the code embed or or in the variables panel. Compared to the other two frameworks Lumos uses Webflow in a way that is more clever, but less intuitive for beginners (more on this below). Like I mentioned above Lumos v2 is much more intuitive than v1 becuase it uses native Webflow variables wherever possible rather than having all of the variables in custom code, but it is still a more complex system than the other two options above.
2. Design system flexibility
Because Lumos is closely related to design tokens it works best when the design you are working off of has a lot of consistency. In many cases this is a good best practice and can make you a better designer when you have this framework in mind. That being said, for those developing someone else’s designs, consistency isn’t always a given. Additionally, some brands require more visual variety than others. This issue becomes especially noticeable when it comes to the color system. If the design you’re building uses 5+ text colors and has no clear delineation between color modes then using Lumos is going to be an uphill battle and you may spend more time fighting the systems in place rather than benefiting from them.
Final Thoughts
Overall, Lumos is definitely the most circumstantial framework of the three on this list but it comes with advanced features that no other framework is going to include, and it is becoming my personal favorite of the three the more I use it. While it definitely has a learning curve, Lumos is incredibly well though out and is an excellent addition to the Webflow ecosystem and community. Personally I’m going to be using Lumos whenever I can but I’m also aware that not every project is going to be a great fit for this system depending on the design system, client skills, and level of client involvement.
So which one is right for you?
Okay, so you’ve read through this whole blog post (or maybe you skimmed it), and now you need to decide which framework to learn and use. To be honest, if building in Webflow is a big part of your job I’d recommend learning all three. Each of the above frameworks will give you valuable knowledge on how to build sites more efficiently, sustainably, and accessibly. That being said, if you don't know any of them you need to start somewhere. If you're new to Webflow I would recommend learning Client-First to start, then MAST and/or Lumos depending on which one sounds more beneficial to you. Whether you build a full site (or several) with each one or just spend time reading the documentation is completely up to you.
The needs for each developer, client, and website are different but its important to make an educated decision as to what framework is going to be the best fit for a project. Beyond understanding your personal development style there are a few main factors when it comes to choosing a Webflow framework.
- Who is going to be the final person (or team) that is updating this website, and what skill level are they when it comes to using Webflow.
- How was the design built, is it using consistent design styles or is there a lot of variation in color, typography, horizontal padding etc.
- How many pages will the site be, is this going to be a 20+ page site that keeps growing with an expanding tech startup, or just a few pages and focussed primarily on interactions.
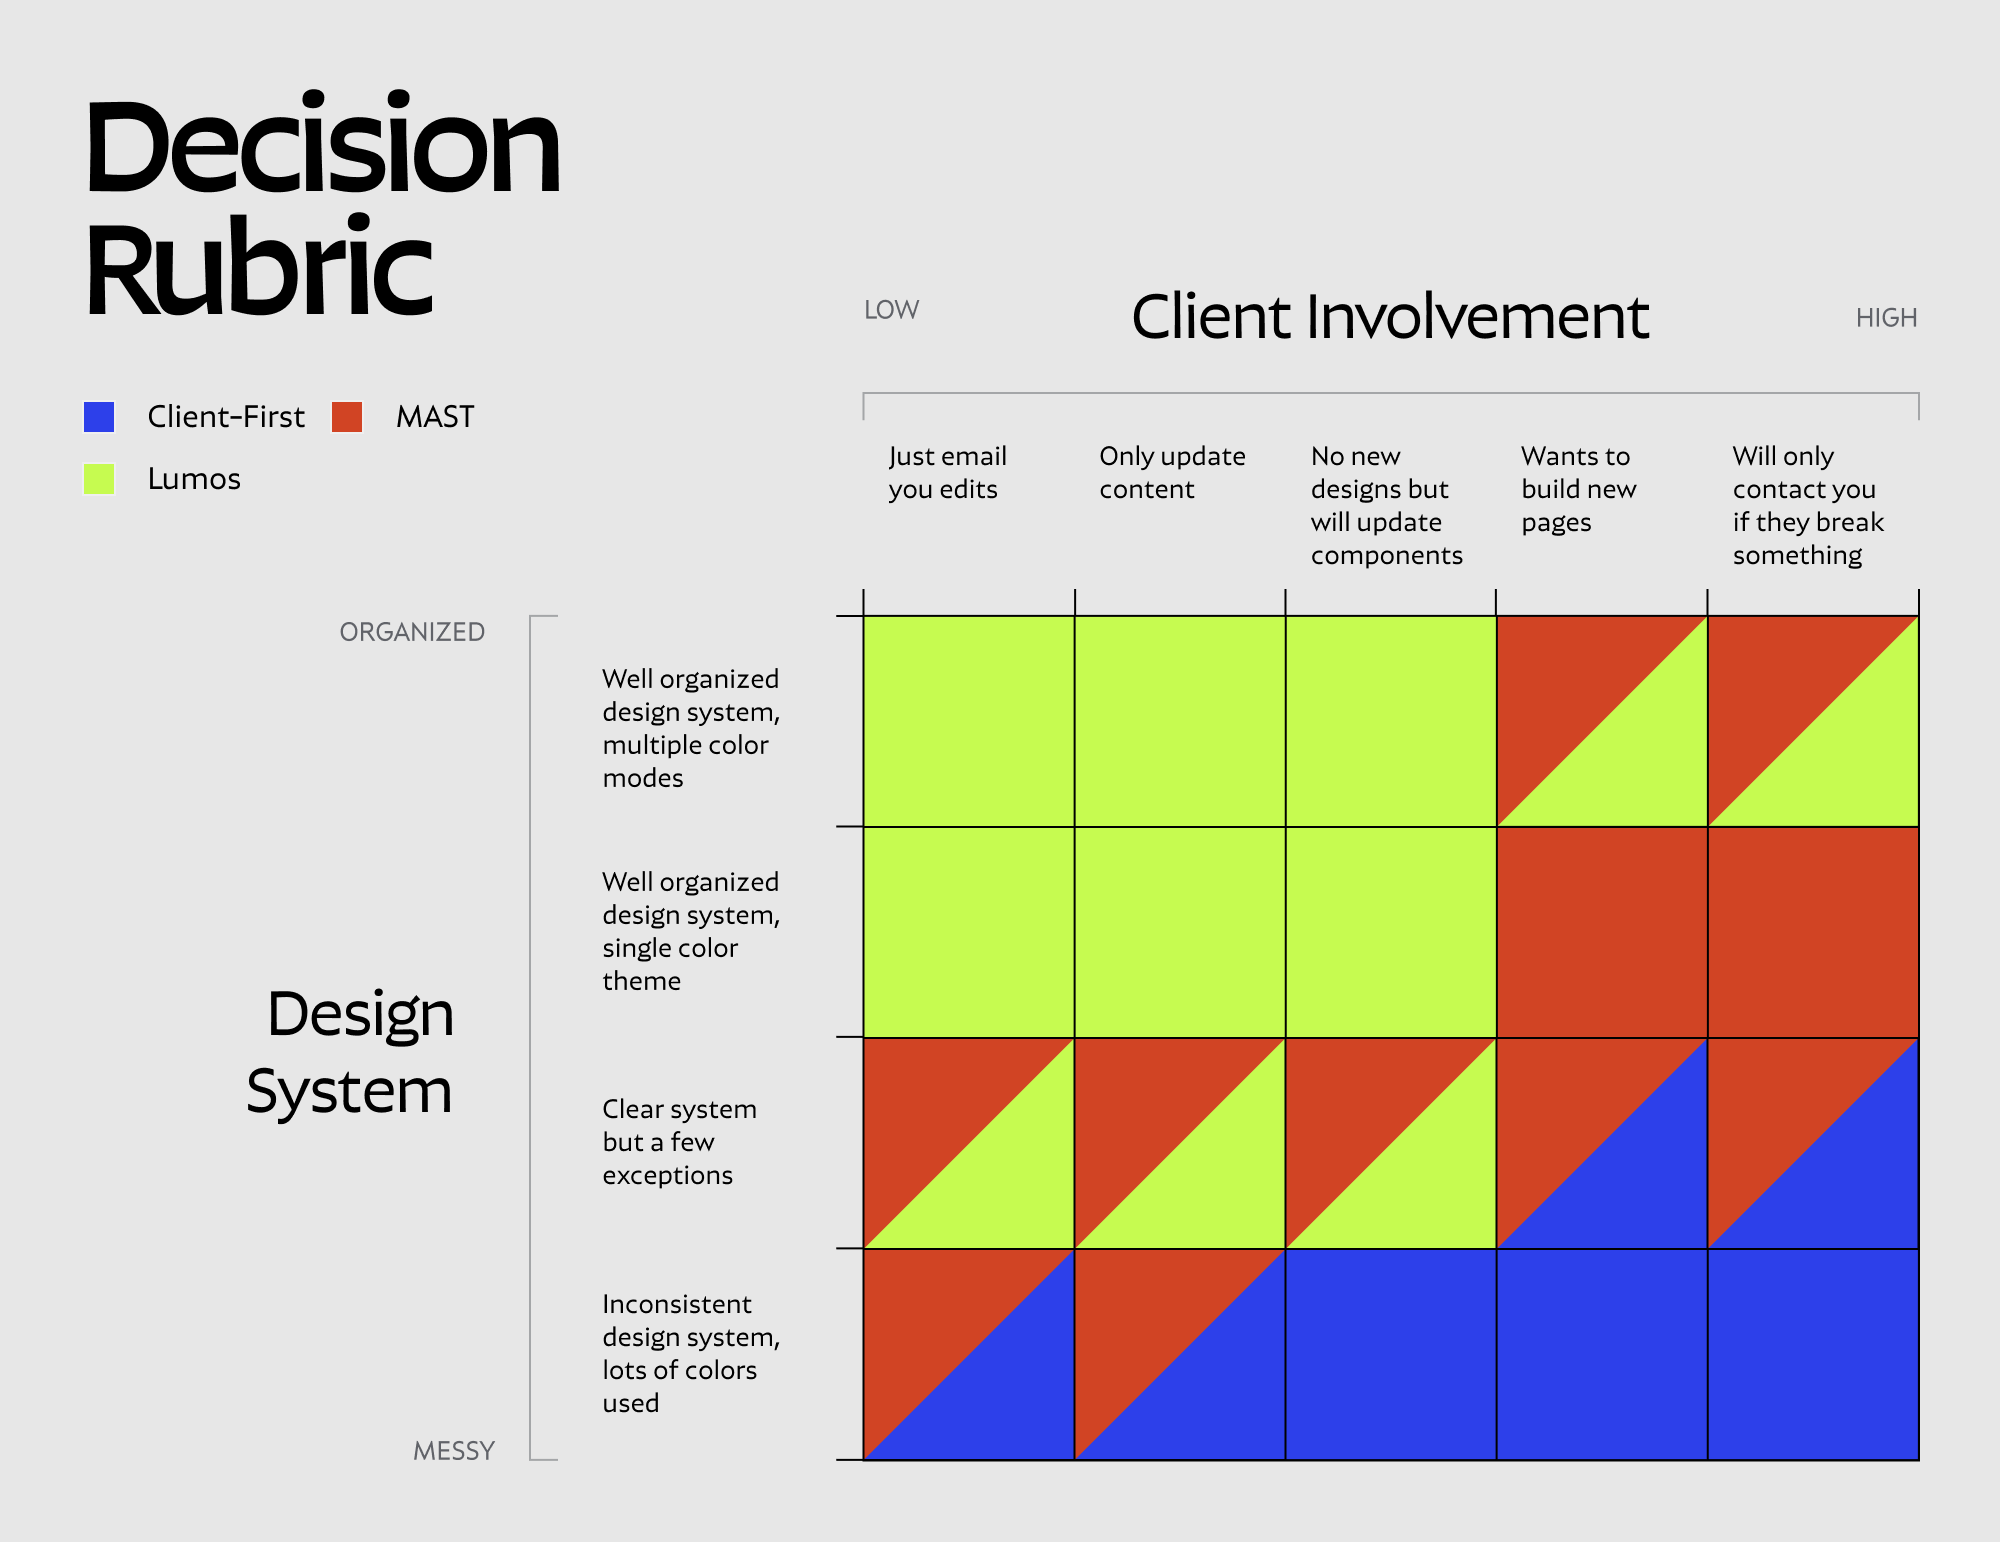
Each of these factors can make a big difference. A larger site is going to be harder to make global updates to so using Lumos would have more significant benefits and would probably be worth a bit more onboarding time. If a client wants a lot of control in the Designer but isn’t very knowledgable with Webflow, Client-First is probably the best bet because it is the most forgiving due to the amount of custom classes it uses. Maybe you are part of a mid size tech company that needs to focus on performance but still enable marketing teammates with less Webflow knowledge to make updates in the designer so MAST is your best bet.
Ultimately there is no one right answer. For me, most of my projects are for clients that need sites between 5-20 pages. Generally, my client’s aren’t Webflow professionals but they still want to be able to update their own sites. Some clients are happy just using the editor and will contact me anytime they need larger design updates or new static pages, but some would rather mess around in the designer and try to figure things out themselves. I’d encourage you to think about which aspects of the site are most important for you (easy onboarding, performance, maintainability, consistent design systems etc.) and let that inform your decision. I’ve put together a little rubric that attempts to visualize how I make the decision on which framework to use for a project, but these factors are going to be different for everyone. Note: the below graphic isn't meant to imply that the frameworks only work under the following circumstances, just that this is how I make the decision on which system to use.
Honorable Mentions
Like I said above, the three frameworks I dove into in this article are the only ones that I have spent enough time with to really understand well and use on client projects, but there are a lot of other ones out there that are also well thought out (even if they didn’t really fit my development style), so I wanted to shout out a few others that are definitely worth checking out. There might also be others I haven’t heard about so this definitely isn’t an exhaustive list but hopefully its a good starting point as you continue your Webflow journey.
Hatch
Hatch (by Mackenzie Child) was actually one of the earliest frameworks to get released, and launched in October 2020. I didn’t focus on it for two main reasons. The first is that the documentation is much less robust than the other frameworks on this list, it includes a lot of utility classes but doesn’t go into as much depth on naming convention, page structure and other details. The second is that it is definitely a stacked class based utility system and I find those to have a lot of downsides (some of which I discussed above) when it comes to working in Webflow. That being said Hatch was definitely a huge milestone in the community and definitely laid the groundwork for a lot of the frameworks that came later. Huge props to Mackenzie Child for putting a lot of work and thought into this one.
Knockout
Knockout (by Edgar Allan) has a lot of similarities to Hatch but is more robust. It came out in February 2022 and provided a very different workflow from Client-First which was gaining a lot of popularity. It is also a utility first system that relies on deep class stacking (as opposed to custom classes) but it is more detailed and feature rich. The documentation is really thorough and a lot of thought went into dealing with some of the downsides of Webflow class stacking (like naming the colors based on their role eg Primary, Secondary… instead of the color name so that the values can be changed later without it messing up stacked classes). Ultimately I just found the class stacking workflow to be frustrating to use but it is definitely a viable system and absolutely worth checking out if you want a framework with a lot of utility classes built in.
The System
The System by Matías Pitters is another framework worth looking into. Matías is a Webflow expert with a huge amount of experience — he released this framework in September 2022. It includes a lot of interesting concepts including a naming convention with 4 different sub-spaces and a global layout based on one single class. Personally I just didn’t vibe with it as much as Client-First which I was using for most of my projects at that point but it is definitely worth checking out and has a lot of really cool ideas built into it.
Closing thoughts
Phew, that was a long one, if you stuck it out this far I really appreciate it. Hopefully this article helped you get a better understanding of what your options are and learn about the pros and cons of each framework. When it comes to Webflow there’s always more to learn but there’s also so many incredible free resources out there and it really is a wonderful community so I wish you all the best as you continue your Webflow journey. If you found this helpful feel free to send me a DM on Twitter!
Heading 1 will be longer with text
Heading 2 will be longer with text
Heading 3 will be longer with text
Heading 4 will be longer with text
Heading 5
Heading 6
Lorem ipsum dolor sit amet, consectetur adipiscing elit, sed do eiusmod tempor incididunt ut labore et dolore magna aliqua. Ut enim ad minim veniam, quis nostrud exercitation ullamco laboris nisi ut aliquip ex ea commodo consequat. Duis aute irure dolor in reprehenderit in voluptate velit esse cillum dolore eu fugiat nulla pariatur.
Block quote
Ordered list
- Item 1
- Item 2
- Item 3
Unordered list
- Item A
- Item B
- Item C
Bold text
Emphasis
Superscript
Subscript
Featured Resource:

Related Posts
8 CSS snippets that expand functionality in Webflow
A few custom CSS code snippets that let you do things that aren't natively available in the Webflow designer. These are really easy to copy and paste into your project
Modular Component Libraries in Webflow
Learn best practices for creating component libraries in Webflow including tips on the new Webflow Slots feature

10 Questions to ask an agency or freelancer before hiring them to make your webflow site
This post will help you ask the right questions of your future Webflow developer so you can make sure the site you get is high quality and wont' cause you issues down the road.
Related Posts
let's create something


